How To Troubleshoot Linksys Velop Setup From Web Interface?
Are you experiencing issues while setting up Linksys Veop mesh Wi-Fi system using the Linksys app? If yes, then you have come to the right place. Here, you will learn everything that you need to know to troubleshoot Linksys Velop Setup from the web interface.
First of all, you need to check whether your nod is in factory default or not. You need to reset the node in order to bring it back to factory defaults. The Velop needs to be connected to the PC through a wireless network or Ethernet.
How to Set up the Node Using the Velop Simple Setup Page?
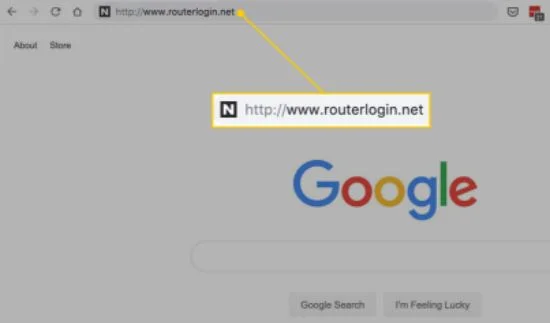
Step 1: Open your internet browser and enter routerlogin.com in the location bar of your browser.
Step 2: Now, you will see a smart Wi-Fi page on the screen.
Step 3: Select Desktop-blocking.html and use Setup.html to replace it.
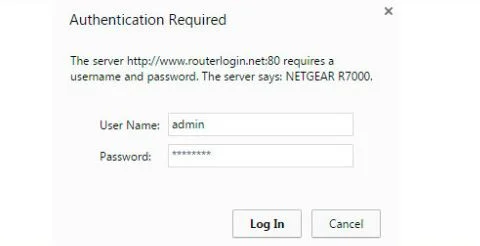
Step 4: After that, you need to enter the username and password. Enter admin in both sections.
Step 5: Choose your desired Wi-Fi settings.
Step 6: Then, save the setup node. This will save node as master and "Password" as admin.
Step 7: Once you add the nodes, select Finish.
In case you are connecting the node wirelessly, then you must enter the network name of your Velop network. You can now use the simple interface of Velop to setup the primary node.
Setting up Network Connection
In case you are encountering issues in setting up a network connection, then below we have stated some tricks that you can apply to fix this problem.
Step 1: Open the same link on your web browser and then press the enter key.
Step 2: Select the Velop logo and wait for the page to load.
Step 3: Now, type admin on the login page.
Step 4: Go to the end of the screen and select the CA option.
Step 5: Then, go to the main dashboard and select "Connectivity". After that, you need to select "Internet Settings". Once you change the connection type, you need to click on Apply. Then, click on Save to save the settings.
Step 6: Launch Veop setup and then enter the network name and password for your Velop network. Now, select Setup Node.
Step 7: After that, you need to configure a few details such as changing the node mode to parent. Then, enter Admin in the password section.
Step 8: Choose the name of Node as Node 1.
Step 9: Select Ok and then check the network connection. Once you save the wireless settings on your node, you can connect to the new name of your Velop network.
This will successfully set the primary node and if you desire to add a secondary node, turn on the next node and wait for the color of light to change to purple. to add more nods you need to select the option of "Add additional nodes" by going to the main menu.
After you add the nodes, you will see a greyed-out option that indicates that the nodes are sending information to the primary one. Once you see a stable purple light on the secondary node, you can move on to the next of physically connecting the primary node to the secondary node. If you see a solid blue light, then that means the node is ready. Now, you can keep the secondary node at any place by disconnecting it from the primary one.
- Suraj Singh
- Last Update: 21 Jan 2024
Popular Post